프로듀서 측의 전반적인 메커니즘

프로듀서 API 는 매우 단순하지만, 우리가 테이터를 전송할때 내부적으로는 조금 더 많은 작업들이 이루어진다.
1) 카프카에 메시지를 쓰는 작업은 ProducerRecord 객체를 생성함으로써 시작된다. 여기서 레코드가 저장될 토픽과 밸류 지정은 필수사항이지만, 키와 파티션 지정은 선택사항이다. 일단 ProducerRecord를 전송하는 API를 호출했을 때 프로듀서가 가장 먼저 하는 일은 키와 값 객체가 네트워크 상에서 전송될 수 있도록 직렬화해서 바이트 배열로 변환하는 것이다.(=Serializing)
2) 그 다음에, 만약 파티션을 명시적으로 지정하지 않았다면 해당 데이터를 파티셔너에게로 보낸다. 파티셔너는 파티션을 결정하는 역할을 하는데, 그 기준은 보통 ProducerRecord 객체의 키의 값이다. 파티션이 결정되어 메시지가 전송될 토픽과 파티션이 확정되면,
3) 프로듀서는 이 레코드를 같은 토픽 파티션으로 전송될 레코드들을 모든 레코드 배치(Record Batch)에 추가한다.
4) 그러면 별도의 스레드가 이 레코드 배치를 적절한 카프라 브로커에게 전송한다.
5) 브로커가 메시지를 받으면 응답을 돌려주게 되어 있다. 메시지가 성공적으로 저장되었을 경우 브로커는 토픽, 파티션, 그리고 해당 파티션 안에서의 레코드 오프셋을 담은 RecordMetadata객체를 리턴한다. 메시지가 저장에 실패했을 땐느 에러가 리턴된다. 프로튜서가 에러를 수신했을 경우, 메시지 쓰기를 포기하고 사용자에게 에러를 리턴하기 전까지 몇 번 더 재전송을 시도할 수 있다.
프로듀서 생성하기
카프카에 메시지를 쓰려면 우선 운하는 속성을 지정해서 프로듀서 객체를 생성해야 한다. 키프카 프로듀서는 아래의 3개의 필수 속성값을 갖는다.
- bootstrap.servers : 카프카 클러스터와 첫 연결을 생성하기 위해 프로듀서가 사용할 브로커의 host:port 목록이다.
- key.serializer : 카프카에 쓸 레코드의 키의 값을 직렬화하기 위해 사용하는 시리얼라이저 클래스의 이름이다. 카프카의 Client패키지에는 ByteArraySerializer, StringSerializer, IntergerSerializer 등이 포함되어 있으므로 자주 사용되는 타입을 사용할 경우 시리얼라이저를 직접 구현할 필요는 없다.
- value.serialzier : 카프카에 쓸 레코드의 밸류값을 직렬화하기 위해 사용하는 시리얼라이저 클래스의 이름이다. 키 값으로 쓰일 객체를 직렬화하기 위해 key.serializer에 클래스 이름을 설정하는 것과 마찬가지로 밸류값으로 쓰일 객체를 직렬화하는 클래스 이름을 value.serializer에 설정해주면 된다.
Properties consumerProps = new Properties();
kafkaProps.put("bootstrap.servers", "localhost:9092");
kafkaProps.put("group.id", "my-consumer-group"); // Required for consumer groups
kafkaProps.put("key.deserializer", "org.apache.kafka.common.serialization.StringDeserializer");
kafkaProps.put("value.deserializer", "org.apache.kafka.common.serialization.StringDeserializer");

kafkaProducer<String, String> Producer = new KafkaProducer<String, String>(kafkaProps);
메시지 전송 방법
- Fire and Forget : 메시지를 전송만하고 성공 혹은 실패 여부에는 신경 쓰지 않는다. 카프카가 가용성이 높고 프로듀서는 자동으로 전송 실패한 메시지를 재전송 시도하기 때문에 대부분의 경우 메시지는 성공적으로 전달된다.
- Synchronous Send : send() 메서드는 Future 객체를 리턴한다. 하지만 다음 메시지를 전송하기 전 get() 메서드를 호출해서 작업이 완료될 때까지 기다렸다가 실제 성공 여부를 확인해야 한다.
동기적으로 메시지를 전송할 경우 전송을 요청하는 스레드는 이 시간동안 아무것도 안 하면서 기다려야 한다. 다른 메시지를 전송할 수 없는 것은 물론이다. 결과적으로 성능이 크게 낮아지기 때문에 동기적 전송은 실제로 사용되는 애플리케이션은 잘 사용되지는 않는다.
ProducerRecord<String, String> record = new ProducerRecord<>("CustomerCountry", "Precision Products", "France");
try {
	producer.send(record).get();
} catch (Exception e) {
	e.printStrackTrace();
}
Kafka Producer에는 두가지 종류의 에러가 있다. 재시도 가능한 에러는 메시지를 다시 전송함으로써 해결될 수 있는 에러를 가리킨다. 반면에 어떠한 에러들은 재시도를 한다고 해서 해결되지는 않는데, 메시지 크기가 너무 클 경우가 한 예다. 이러한 경우, KafkaProducer는 재시도 없이 바로 예외를 발생시킨다.
- Asynchronous Send : 콜백 함수와 함께 send() 메서드를 호출하면 카프카 브로커로부터 응답을 받는 시점에서 자공으로 콜백함수가 호출된다.
실제로 대부분의 경우 굳이 응답이 필요없다. 카프카는 레코드를 쓴 뒤 해당 레코드의 토픽, 파티션 그리고 오프셋을 리턴하는데, 대부분의 애플리케이션에서는 이런 메타데이터가 필요 없기 때문이다. 반대로, 메시지 전송에 완전히 실패했을 경우에는 그런 내용을 알아야 한다. 그래야 예외를 발생시키든지, 에러를 로그에 쓰든지, 아니면 사후 분석을 위해 에러파일에 메시지를 쓰거나 할수 있기 때문이다. 이를 위해 프로듀서는 레코드를 전송할 때 콜백을 사용할 수 있도록 한다.
private class DemoProducerCallback implements Callback {
	@Override
    public void onCompletion(RecordMetadata recordMetadata, Exception e) {
    	if (e != null) {
        	e.printStackTrace();
        }
    }
}

ProducerRecord<String, String> record = new ProducerRecord<>("CustomerCountry", "Biomedical Materials", "USA");
producer.send(record, new DemoProduicerCallback());
전송 방식 비교
| 구분 | Fire and Forget | Synchronous | Asynchronous |
| 처리량 | 최고 | 최저 | 높음 |
| 신뢰성 | 최저 | 최고 | 높음 |
| 복잡도 | 낮음 | 중간 | 높음 |
| 응답 시간 | 즉시 | 느림 | 즉시 |
| 에러 처리 | 불가능 | 즉시 가능 | Callback으로 가능 |
| 사용 권장도 | 제한적 | 제한적 | 권장 |
프로듀서 설정하기
지금까지 우리는 프로듀서 설정값 중 몇 개만을 살펴보았다. 프로듀서는 굉장히 많은 수의 설정값을 가지고 있다. 대부분의 경우 합리적인 기본값을 가지고 있기 때문에 각각의 설정값을 일일이 잡아 줄 필요는 없다.
https://docs.confluent.io/platform/current/installation/configuration/producer-configs.html
Kafka Producer Configuration Reference for Confluent Platform | Confluent Documentation
Enter a string to search and filter by configuration property name. compression.type The compression type for all data generated by the producer. The default is none (i.e. no compression). Valid values are none, gzip, snappy, lz4, or zstd. Compression is o
docs.confluent.io
- client.id : 프로듀서와 그것을 사용하는 애플리케이션을 구분하기 위한 논리적 식별자, 임의의 문자열을 사용할 수 있는데, 브로커는 프로듀서가 보내온 메시지를 서로 구분하기 위해 이값을 사용한다. 이 값을 잘 선택하는 것은 문제가 발생했을때 트러블 슈팅을 쉽게 한다.
- acks : 프로듀서가 임의의 쓰기 작업이 성공했다고 판별하기 위해 얼마나 많은 파티션 레플리카가 해당 레코드를 받아야 하는지를 결정한다. 기본 값은 리더가 해당 레코드를 받은 뒤 쓰기 작업이 성공했다고 응답하는 것이다.
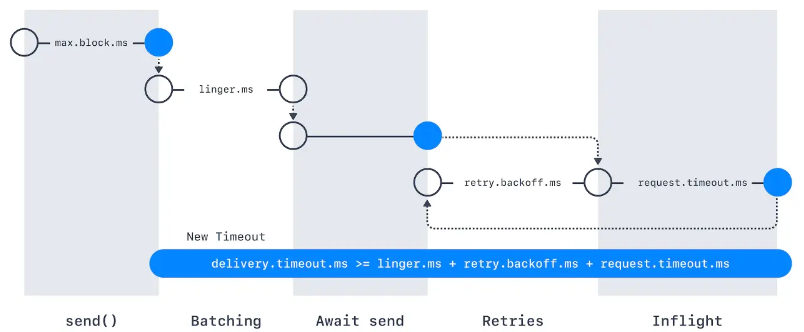
- max.block.ms : 이 매개변수는 아래의 경우에 프로듀서가 얼마나 오랫동안 블록되는지 결정한다. send ()를 호출했을때, 프로듀서 전송 버퍼가 가득차거나 메타데이터가 아직 사용가능하지 않을때 블록된다. 이 상태에서 max.block.ms만큼 시간이 지체되면 예외가 발생한다.
- delivery.timeout.ms : 이 설정은 레코드 전송 준비가 완료된 시점(즉, send()가 문제없이 리턴되고 레코드가 배치에 저장된 시점)에서부터 브로커의 응답을 받거나 아니면 전송을 포기하게 되는 시점까지의 제한시간을 결정한다. 이 값은 linger.ms와 request.timeout.ms보다 커야 한다.
- request.timeout.ms : 이 매개변수는 프로듀서가 데이터를 전송할 때 서버로부터 응답을 받기 위해 얼마나 기다릴 것인지를 결정한다. 이 값은 각각의 쓰기 요청 후 전송을 포기하기까지 대기하는 시간이다.
- retries, retry.backoff.ms : 프로듀서가 서버로부터 에러 메시지를 받았을때 이게 일시적인 에러라면, retries는 재전송할 횟수 retry.backoff.ms는 재시도 사이의 간격이다.
- linger.ms : 현재 배치를 전송하기 전까지 대기하는 시간을 결정한다.KafkaProducer는 현재 배치가 가득 차거나 linger.ms에 설정된 제한 시간이 되었을 때 메시지 배치를 전송한다.
- buffer.memory : 프로듀서가 메시지를 전송하기 전에 메시지를 대기시키는 버퍼의 크기를 결정한다.
- copression.type : 기본적으로 메시지는 압축되지 않은 상태로 전송된다. 하지만 이 매개변수를 통하여 snappy, gzip, lz4, zstd 중 하나로 설정하면 해당 업축 알고리즘을 사용해서 메시지를 압축한뒤 브로커로 전송된다.
- batch.size : 같은 파티션에 다수의 레코드가 전송될 경우 프로듀서는 이것들을 배치 단위로 모아서 한꺼번에 전송한다. 참고로 batch size와는 무관하게 프로듀서는 하나의 메시지만 들어있는 배치도 전송하는 경우도 있다.
- max.in.flight.requests.per.connection : 이 매개변수는 프로듀서가 서버로부터 응답을 받지 못한 상태에서 전송할 수 있는 최대 메시지의 수를 결정한다.
- max.request.size : 프로듀서가 전송하는 쓰기 요청의 크기를 결정한다. (=메시지 최대 크기). 브로커 측에서는 message.max.bytes 매개변수가 있으므로 미리 매핑하는 것이 좋다.
- receive.buffer.bytes, send.buffer.bytes : 이 매개변수는 데이터를 읽거나 쓸때 소켓이 사용하는 TCP 송수신 버퍼의 크기를 결정한다.
- enable.idempotence : 이 기능이 활성화 되면, 프로듀서는 레코드를 보낼 때마다 순차적ㅇ니 번호를 붙여서 보내게된다. 만약 브로커가 동일한 번호를 가진 레코드를 가진 2개 이상 받을 경우 하나만 저장하게 된다.
커스텀 시리얼라이저
프로듀서를 설정할 때는 반드시 Serializer를 지정해 주어야 한다.
많은 전문가들이 범용 시리얼라이저 를 사용하기를 강력히 권고한다.
대표적으로 많이 사용하는 Avro 스키마를 사용할 경우, Violation Case를 잡아내어 약속되지 않은 메시지 발행을 막을 수 있고 Evolution 전략을 수립하여 안정감있는 Transition에 기여할 수 있다.
카프카에서 Avro 레코드 사용하기
레코드를 읽을 때 스키마 전체를 필요로 하기 때문에 어딘가 스키마를 저장해 두기는 해야한다. 이 문제를 해결하기 위해 스키마 레지스트리라 불리는 아키텍처 패턴을 사용할 수 있다.

https://www.confluent.io/blog/how-schema-registry-clients-work/
How Schema Registry Producer and Consumer Clients Work
Learn what happens behind the scenes in Apache Kafka producer and consumer clients when communicating with Schema Registry and serializing/deserializing messages.
www.confluent.io
여기서 제공되는 Library에 따라 다르지만 여러 방식으로 Serialization하는 과정에서 스키마를 참조 할 수 있다.
보낼 데이터
export class ProduceMessageDto {
  //** Kafka topic to publish the message to */
  topic: string;

  //** The message payload to be sent */
  value: Record<string, any>;

  //** The schema ID to use for encoding the message */
  schemaId: number;
}
Kafka Client와는 별개로 Schema Registry 에서 Fetch 받고 Serializing 하는 Client 도 필요합니다.
import { Injectable, Logger } from '@nestjs/common';
import {
  SchemaRegistryClient,
  AvroSerializer,
  AvroDeserializer,
  SerdeType,
  SchemaId,
  AvroSerializerConfig,
  AvroDeserializerConfig,
} from '@confluentinc/schemaregistry';
import { Schema, Type } from 'avsc';

@Injectable()
export class SchemaConfluentRegistryService {
  private readonly registry: SchemaRegistryClient;
  private readonly serializer: AvroSerializer;
  private readonly deserializer: AvroDeserializer;
  private readonly logger = new Logger(SchemaConfluentRegistryService.name);

  constructor() {
    this.registry = new SchemaRegistryClient({
      baseURLs: [
        process.env.SCHEMA_REGISTRY_URL ?? 'https://your-schema-registry-url',
      ],
      basicAuthCredentials: {
        credentialsSource: 'USER_INFO',
        userInfo: `${process.env.SCHEMA_REGISTRY_API_KEY}:${process.env.SCHEMA_REGISTRY_API_SECRET}`,
      },
    });

    // Initialize serializer
    const avroSerializerConfig: AvroSerializerConfig = {
      useLatestVersion: true,
      autoRegisterSchemas: false,
    };
    this.serializer = new AvroSerializer(
      this.registry,
      SerdeType.VALUE,
      avroSerializerConfig,
    );

    // Initialize deserializer
    const avroDeserializerConfig: AvroDeserializerConfig = {};
    this.deserializer = new AvroDeserializer(
      this.registry,
      SerdeType.VALUE,
      avroDeserializerConfig,
    );
  }

  /**
   * Encode message with specific schemaId for producer
   * @param topic : string - Kafka topic name
   * @param payload : any - The message payload to encode
   * @param schemaId : number - The schema ID to use for encoding from producer
   * @returns {Promise<Buffer>}
   * @throws Error if encoding fails
   * Usage:
   * const encoded = await schemaService.encodeMessage('my-topic', myPayload, 000000);
   */
  async encodeMessage(
    topic: string,
    payload: any,
    schemaId: number,
  ): Promise<Buffer> {
    const sid = new SchemaId('AVRO', schemaId);
    const subject = `${topic}-value`;

    // Fetch schema by ID
    const schemaInfo = await this.registry.getBySubjectAndId(subject, schemaId);
    if (!schemaInfo?.schema) {
      throw new Error(
        `Schema not found for subject ${subject} and ID ${schemaId}`,
      );
    }

    // Parse schema and create Avro type
    const schema: Schema = JSON.parse(schemaInfo.schema) as Schema;
    const type = Type.forSchema(schema);

    // validate payload with schema
    const errors = this.getSchemaErrors(type, payload);

    // You can log or send email or handle errors suitably with your use case
    if (errors.length > 0) {
      this.logger.error('Schema validation failed:', errors);
      throw new Error(errors.join('; '));
    }
    try {
      // Validate payload against schema
      const payloadBuffer = type.toBuffer(payload);

      // Serialize with schema ID
      return this.serializer.serializeSchemaId(topic, payloadBuffer, sid);
    } catch (error) {
      this.logger.error('Error encoding message:', error);
      throw error;
    }
  }

  /**
   * Decode a message using the normal deserialization process.
   * @param topic : string - Kafka topic name
   * @param payload : Buffer - The message payload to decode
   * @returns {Promise<Buffer>}
   * @throws Error if decoding fails
   * Usage:
   * const decoded = await schemaService.decodeMessageNormal('my-topic', messageBuffer);
   */
  async decodeMessageNormal(
    topic: string,
    payload: Buffer,
  ): Promise<Record<string, any>> {
    try {
      // Deserialize the message
      return (await this.deserializer.deserialize(topic, payload)) as Buffer;
    } catch (error) {
      this.logger.error('Error decoding message:', error);
      throw error;
    }
  }

  /** Encode message with latest schemaId for producer
   * Encode message with latest schemaId for producer
   * @param topic : string - Kafka topic name
   * @param payload : any - The message payload to encode
   * @returns {Promise<Buffer>}
   * @throws Error if encoding fails
   * Usage:
   * const encoded = await schemaService.encodeWithLatestSchemaId('my-topic', myPayload);
   */
  async encodeWithLatestSchemaId(topic: string, payload: any): Promise<Buffer> {
    try {
      return await this.serializer.serialize(topic, payload);
    } catch (error) {
      this.logger.error('Error encoding message with latest schema ID:', error);
      throw error;
    }
  }
  /**
   * Track schema validation errors
   * @param type : Type - The Avro schema type
   * @param payload : any - The payload to validate
   * @returns string[] - An array of validation error messages, empty if valid
   */
  getSchemaErrors(type: Type, payload: any): string[] {
    const errors: string[] = [];

    const isValid = type.isValid(payload, {
      errorHook: (path, value, type) => {
        errors.push(
          `Field error at ${path.join('.') || '(root)'}: expected ${type.toString()}, got ${value}`,
        );
      },
    });

    return isValid ? [] : errors;
  }
}
이제 Producer Service와 합쳐야 합니다.
import {
  Inject,
  Injectable,
  Logger,
  OnModuleDestroy,
  OnModuleInit,
} from '@nestjs/common';
import { ProduceMessageDto } from './dto/producer-message.dto';
import { KafkaJS } from '@confluentinc/kafka-javascript';
import { KafkaClientService } from './kafka-client.service';
import { SchemaConfluentRegistryService } from './schema-client.service';
import { ClientKafka } from '@nestjs/microservices';

@Injectable()
export class ConfluentKafkaProducerService
  implements OnModuleInit, OnModuleDestroy
{
  private readonly logger = new Logger(ConfluentKafkaProducerService.name);
  private readonly producer: KafkaJS.Producer;

  constructor(
    private readonly registry: SchemaConfluentRegistryService,
    private readonly clientService: KafkaClientService,
    @Inject('KAFKA_PRODUCER') private readonly clientKafka: ClientKafka,
  ) {
    this.producer = this.clientService.getProducer();
  }

  async onModuleInit() {
    await this.producer.connect();
    this.logger.log('✅ Confluent Kafka Producer connected !');

    // If using ClientKafka
    // this.clientKafka.connect();
  }

  async onModuleDestroy() {
    await this.producer.disconnect();
    this.logger.log('❌ Confluent Kafka Producer disconnected !');
  }

  /**
   * Emit a message to the specified Kafka topic.
   * @param dto - The data transfer object containing message details.
   * @returns Promise<void>
   * @throws Error if message sending fails
   * Usage:
   * const dto: ProduceMessageDto = {
   *   topic: 'your-topic',
   *   value: { key: 'value' },
   *   schemaId: 000000,
   * };
   * await producerService.emitMessageWithSchemaId(dto);
   */
  async emitMessageWithSchemaId(dto: ProduceMessageDto) {
    try {
      const payload = { ...dto.value };

      const encodedValue = await this.registry.encodeMessage(
        dto.topic,
        payload,
        dto.schemaId,
      );

      // This sample for using latest schema id from registry
      // const encodedValue = await this.registry.encodeWithLatestSchemaId(
      //   dto.topic,
      //   payload,
      // );

      await this.producer.send({
        topic: dto.topic,
        messages: [{ value: encodedValue }],
      });

      // If using ClientKafka
      // this.clientKafka.emit(dto.topic, { value: encodedValue });
    } catch (error) {
      this.logger.error(
        `❌ Failed to send message to topic [${dto.topic}]: ${error}`,
      );
    }

    this.logger.log(`📤 Sent message to topic [${dto.topic}]`);
  }
}
어플리케이션에서 사용은 이렇게 합니다.
import { ConfluentKafkaProducerService } from '@common/config/kafka-confluent/kafka-confluent-producer.service';
import { KAFKA_TOPICS } from '@common/constant';
import { BadRequestException, Injectable, Logger } from '@nestjs/common';
import { OnEvent } from '@nestjs/event-emitter';
import { Message } from './dto/emit-event.input';
import {
  MessageEntity,
  Record,
} from './dto/record.dto';
import { EmitEventDto } from './dto/emit-event.dto';

@Injectable()
export class FeatureService {
  private readonly logger = new Logger(FeatureService.name);

  constructor(
    private readonly confluentKafkaProducerService: ConfluentKafkaProducerService,
  ) {}
  @OnEvent(`kafka.${KAFKA_TOPICS.KAFKA_TOPIC_A}`)
  async handleEvent({
    topic,
    data,
  }: {
    topic: string;
    data: Message;
  }) {
    this.logger.log(`Event received on topic: ${topic}`);
    this.logger.log(`Received event detail: ${JSON.stringify(data)}`);

    // Assume all required fields are present
    const requiredFields: (keyof Message)[] = [
      'message',
      'title',
    ];

    for (const field of requiredFields) {
      if (
        !data[field] ||
        (Array.isArray(data[field]) && data[field].length === 0)
      ) {
        throw new BadRequestException(`Missing required field: ${field}`);
      }
    }

    // Simulate saving to DB
    const record: Record = {
      topic,
      message: data.message,
      title: data.title,
      options: data.options,
      createdAt: new Date(),
    };

  }

  async emitTestEvent(emitEventDto: EmitEventDto): Promise<boolean> {
    const { value, topic, schemaId } = emitEventDto;
    try {
      //#region Simulate saving MessageEntity to DB
      this.logger.log('Saving MessageEntity to the database...');
      const message: MessageEntity = {
        message: value.message,
        title: value.title,
        options: value.options,
      };

      this.logger.log('Emitting test event...');
      await this.confluentKafkaProducerService.emitMessageWithSchemaId({
        topic: topic,
        value: value,
        schemaId: schemaId,
      });
      this.logger.log('Test event emitted.');
      return true;
    } catch (error) {
      this.logger.error(`Failed to emit test event: ${error}`);
      return false;
    }
  }
}
여기서 사용되는 상수들은 Constraint로 관리하면 좋습니다.
export const KAFKA_PROVIDER = 'KAFKA_PRODUCER';
export const KAFKA_CLIENT_ID = 'client01';
export const KAFKA_TOPIC_A =
  process.env.KAFKA_TOPIC_A ||
  'default-topic-for-A';

export const SCHEMA_REGISTRY_VERSION = {
  SUBJECT_A: 100000,
};
파티션
키의 역할은 두가지로, 그 자체로 메시지에 함께 저장되는 추가적인 정보이기도 하지만 하나의 토픽에 속한 여러개의 파티션 중 해당 메시지가 저장될 파티션을 결정짓는 기준점이기도 하다. 같은 키 값을 가진 모드 ㄴ메시지는 같은 파티션에 저장되는 것이다.
기본 파티셔너 사용중에 키 값이 null인 레코드가 주어질 경우 한 토픽의 파티션 중 하나에 랜덤하게 저장된다. 각 파티션 별로 저장되는 메시지의 갯수를 균형을 위해 라운드 로빈 알고리즘이 사용된다.
만약 접착성 처리가 있을 경우, 키값이 null인 메시지들은 일단 키값이 있는 메시지 뒤에 따라 붙은 다음에야 라운드 로빈 방식으로 배치된다.
헤더
레코드 헤더는 카프카 레코드의 키/벨류값을 건드리지 않고 추가 메타데이터를 심을 때 사용한다.
인터셉터
클라이언트의 코드를 고치지 않으면서 그 작동을 변경해야 하는 경우가 있다. 모든 어플리케이션에 동일안 작동을 집어넣을 때 많이 사용된다. 가령, 모니터링, 정보추적, 표준헤더삽입.
쿼터, 스로틀링
카프카 브로커에는 쓰기/읽기 속도를 제한할 수 있는 기능이 있다. 모든 클라이언트에 적용되는 쓰기/읽기 쿼터의 기본값은 카프카 브로커를 설정할 때 함께 설정해 줄 수 있다. 예를들어 각각의 프로듀서가 초당 평균적으로 쓸수 있는 데이터를 2MB로 제한하고자한다면, 브로커 설정파일에 quota.producer.default=2M 이라고 추가해주면 되는것이다.
0
'PaaS > MQ' 카테고리의 다른 글
| Kafka 심화) 카프카 내부 알고리즘 (0) | 2026.01.14 |
|---|---|
| Kafka 심화) Consumer (0) | 2026.01.09 |
| TypeScript, NestJS로 Confluent Kafka 연결 3-Consumer 개발 (0) | 2025.09.01 |
| TypeScript, NestJS로 Confluent Kafka 연결 2-Producer 개발 (0) | 2025.09.01 |
| TypeScript, NestJS로 Confluent Kafka 연결 1- Confluent 세팅 (0) | 2025.09.01 |